Wordpress and I have had our ups and downs, but I have to say every time I stray from it I invariably return. While Blogger has the ability to edit my CSS and templates as a free customer, Wordpress has room to grow. So I urge those following me on here to check out the new home (and new name!) of this blog over at:
http://afoodrevolution.wordpress.com
The focus, as always, will be on good wholesome food that everyone can do with minimal effort, and often with minimal time. I'm still tweaking the layout and information over there, but the recipes are up for all currently.
April 17, 2010
April 9, 2010
Food Revolution Friday
I don't think there are many in the United States who have not heard of Jamie Oliver's Food Revolution program on ABC at this point. The issue at hand? How we as a society are killing our children with what we are feeding them. It's a cause that hits me particularly close to home as a mother of a toddler, and as a foodie.
I'll be the first to admit, we ate a great deal of processed, boxed and frozen foods in my house when I was growing up. It wasn't that my mother couldn't cook, (on the contrary!) but that she was a single parent working long hours to keep a roof over our heads and didn't have hours to slave over pans in the kitchen. I was never big on fruit, and to this day I struggle to include enough vegetables in my family's diet.
While interviewing the head chef at my chosen culinary school about job prospects upon graduation, he mentioned the possibility of a corporate chef at a large food manufacturer. I tried not to let the despair the idea of working for a place like that caused me cross my face. I was once a truck driver, and I've been to these food manufacturers and been appalled. Many times the smells emanating from outside were not even close to delicious...especially once you look at the nutrition facts on the side of a box.
Food should be about whole ingredients whenever possible, love, sharing and great flavor. My 16 month old daughter already has a wider palate than many adults I know. I do not always spend hours in the kitchen - on the contrary for with a toddler demanding most of my time meals have to be thought out and made in the minimum time possible. It's not more expensive to eat well, I promise. I buy whole ingredients, capitalizing on coupons and sales as well as the bulk section of my local health store grocers and ethnic markets. I eat in season when possible - sure, sometimes you crave strawberries in February, but I try to keep to the growing season as much as possible - and shop my local farmer's markets to minimize transit time on vegetables and fruits. (I also hauled produce, and the severe under-ripe nature of how things are picked to survive transit and a wait period in the stores would amaze most people). I've eliminated most products in my house that contain High Fructose Corn Syrup - and that includes the bread we buy! My $20 used bread machine takes all the labor out of making a lovely whole wheat bread.
I challenge you on this Food Revolution Friday to examine what you eat and feed your families. Really take a look at it. I challenge you to make one small change in your habits. Maybe it's eating one vegetarian meal a week. Maybe it's cooking one meal, no matter how simple, in your home instead of eating out. Maybe it's replacing one boxed item with something made from scratch (for example, I make bechamel sauces for casseroles rather than using condensed "cream of..." soups).
Please, go visit Jamie Oliver's website and join in the Revolution. The link is in my sidebar....go on, it's ok. You can come back to me when you're done!
April 7, 2010
Tofu and Black Bean Tacos
Tacos - there's not an American household that I know of who doesn't eat tacos on occasion. We love them in my house, but for a while I went vegetarian to force myself to find new and creative ways of incorporating vegetables into our mainly "meat and potato" diet. I found that after a week or so, I absolutely *loved* being a vegetarian, and this simple dish was a fantastic, healthy way to keep my beloved tacos in my diet. You won't miss the grease one bit! Each taco is light yet filling, and the flavor is wonderfully well rounded. Even my carnivore husband, who only reluctantly went mostly vegetarian with me, requested these stay in the meal rotation.
I'm going to attempt to show the frugality of some of these meals, when possible. For instance, I purchase nearly all of the items from this dish at Whole Foods Market - which truth be told has never been known for it's low prices.** However, spices are pennies for what's needed in the bulk section, the tofu I buy their house brand (365) for $1.79 a block, beans are 365 brand (salt free) for $0.99 a can, tortillas I can make for pennies or buy a large stack for about $2-3, and lettuce and tomatoes vary with the season, but generally I don't pay more than a few dollars.
Ingredients:
1 (14-ounce) package extra-firm tofu, drained (I also pressed mine) 1 1/2 teaspoons chili powder 1/2 teaspoon dried oregano 1/2 teaspoon ground cumin 1/2 teaspoon ground coriander 1/2 teaspoon salt 1 tablespoon olive oil 3 cloves garlic, finely chopped 3 green onions, finely chopped 1 (15-ounce) can black beans, drained and rinsed 12 corn tortillas, warmed (if you're feeling adventurous and have a new tortilla press from the quesadillas, try making your own!) 3 cups shredded green leaf lettuce (we used baby spinach) 2 cups chopped tomatoes (we used Muir Glen’s fire roasted diced in a can) 1 1/2 cups shredded cheddar or Monterey Jack cheese
Heat oil in a large skillet over medium heat. Add garlic and two-thirds of the green onions and cook until fragrant, about 2 minutes. Add tofu mixture and cook, stirring occasionally, until most of the moisture has evaporated, 10 to 12 minutes. Add beans and remaining green onions, stir well and cook until beans are heated through, about 2 minutes more.
Spoon tofu mixture into tortillas, top with lettuce, tomatoes and cheese and serve.
Notes from the Kitchen:
To press tofu if you are so inclined to get the extra water out of it (we prefer it for texture), place it on a folded kitchen towel with another towel on top. Place a plate or small baking pan (metal is best - I accidentally dropped a plate once and it shattered) on top with a book on top for weight. Leave until pressed to desired consistency. I generally press mine 30 minutes or so prior to starting dinner. Pressing tofu gets the last of the water out of it making it act like a sponge to any marinade you add, and it also firms the texture up. Freezing and thawing the tofu (just pop the package you get from the store right in the freezer!) prior to cooking it gives it an even firmer, more sponge like texture, and you can pretty much press it by hand then.
Vegan folks could obviously not use cheese, or substitute for vegan soy or rice cheese. The verdict? We both like them BETTER than meat tacos – and we are a taco eating household, let me tell you. Not impressed? My husband has texture issues with both tofu AND beans…and he wanted seconds! This recipe will be a staple in our diet, that’s for sure.
** The key to shopping Whole Foods? BULK SECTIONS! You will save an amazing amount of money shopping the bulk sections of Whole Foods! I get all my grains, flours, spices, and dried legumes at Whole Foods and pay a fraction of what I would paying for plastic wrapped items even at the big box stores. The bonus? Almost all of what I'm getting cheaper is certified organic, and I'm not generating garbage that goes in the bin - plus saving the energy and petroleum that went into manufacturing that plastic. Bulk items in produce can also be very cost effective - watch for mushrooms, carrots, spinach, and any fruit that's currently in season. In Tulsa, the quality of the produce at Whole Foods can only be matched by the local Farmer's Market.
Disclaimer - I am not being compensated by Whole Foods in any capacity at all, all information in here is solely my opinion.
I'm going to attempt to show the frugality of some of these meals, when possible. For instance, I purchase nearly all of the items from this dish at Whole Foods Market - which truth be told has never been known for it's low prices.** However, spices are pennies for what's needed in the bulk section, the tofu I buy their house brand (365) for $1.79 a block, beans are 365 brand (salt free) for $0.99 a can, tortillas I can make for pennies or buy a large stack for about $2-3, and lettuce and tomatoes vary with the season, but generally I don't pay more than a few dollars.

Ingredients:
Heat oil in a large skillet over medium heat. Add garlic and two-thirds of the green onions and cook until fragrant, about 2 minutes. Add tofu mixture and cook, stirring occasionally, until most of the moisture has evaporated, 10 to 12 minutes. Add beans and remaining green onions, stir well and cook until beans are heated through, about 2 minutes more.
Spoon tofu mixture into tortillas, top with lettuce, tomatoes and cheese and serve.
Notes from the Kitchen:
To press tofu if you are so inclined to get the extra water out of it (we prefer it for texture), place it on a folded kitchen towel with another towel on top. Place a plate or small baking pan (metal is best - I accidentally dropped a plate once and it shattered) on top with a book on top for weight. Leave until pressed to desired consistency. I generally press mine 30 minutes or so prior to starting dinner. Pressing tofu gets the last of the water out of it making it act like a sponge to any marinade you add, and it also firms the texture up. Freezing and thawing the tofu (just pop the package you get from the store right in the freezer!) prior to cooking it gives it an even firmer, more sponge like texture, and you can pretty much press it by hand then.
Vegan folks could obviously not use cheese, or substitute for vegan soy or rice cheese. The verdict? We both like them BETTER than meat tacos – and we are a taco eating household, let me tell you. Not impressed? My husband has texture issues with both tofu AND beans…and he wanted seconds! This recipe will be a staple in our diet, that’s for sure.
** The key to shopping Whole Foods? BULK SECTIONS! You will save an amazing amount of money shopping the bulk sections of Whole Foods! I get all my grains, flours, spices, and dried legumes at Whole Foods and pay a fraction of what I would paying for plastic wrapped items even at the big box stores. The bonus? Almost all of what I'm getting cheaper is certified organic, and I'm not generating garbage that goes in the bin - plus saving the energy and petroleum that went into manufacturing that plastic. Bulk items in produce can also be very cost effective - watch for mushrooms, carrots, spinach, and any fruit that's currently in season. In Tulsa, the quality of the produce at Whole Foods can only be matched by the local Farmer's Market.
Disclaimer - I am not being compensated by Whole Foods in any capacity at all, all information in here is solely my opinion.
April 5, 2010
Las Americas Supermercado and Roasted Poblano and Chicken Quesadillas
I am an ethnic food junkie. I especially have a deep soft spot for Latin American cooking, and my few trips mere feet across the Texas border while stuck on a layover while driving a tractor trailer rig were always to partake of the local cuisine in the small cantinas along main roads in Juarez and Nuevo Laredo.
Yesterday I finally decided it was time to explore one of the largest Mexican ethnic markets we have here in Tulsa, the Las Americas Supermercado on 3rd and Lewis. It was not quite what I expected at all! Most ethnic supermarkets we have here in town are small affairs with crowded shelves and laden with odd and dusty products often far past their "best by" dates. Las Americas was large - think the size of a typical American grocery store, and had the layout of any large bulk retailer (think Costco, Sam's Club or BJ's Wholesale) down many of the aisles. Produce was scant and expensive, with the exception of the wide array of chile peppers, fresh cactus, and plantains. Dry goods didn't fair much better - I saw the majority of the brands were ones that I could find in other local chain stores here, often at a better discount. The gems that will keep me shopping at Las Americas? Spices. An entire wall of prepackaged spices, dried chillies, and other oddball herbs. I also scored a lovely little cast iron tortilla press so I can make my own tortillas from scratch. Even more than the spices, however, Las Americas offered a wide fresh meat counter with oddities you generally can't find at the local grocer. Want goat? Check. Bistec (a very thin cut of beef used in numerous dishes)? They have that too. Lots of chicken, pork and beef cuts that are not typical can be had for a good deal. Including offal, if you're so inclined. I did not partake of the meat counter, as there was a line seemingly a mile long (and the store itself is not terribly bilingual...bring your best Spanish to communicate! - signs and products are generally labeled in both English and Spanish)
The only thing I didn't get, which was sadly my entire reason for going to the store, was a bottle of Mexican vanilla. Ah well, guess I'll have to check back in a few days once they restock after the Easter holiday.
What's for Dinner?
Quesadillas with Fire Roasted Poblano Chicken and Mushroom Filling
This recipe I adapted from parts of some recipes I found from Rick Bayless. Marinade is based off of his "Roadside Chicken" with some changes to adapt to what I had on hand.
(Filling)
- 4 large poblano peppers
- 1 lb chicken cut into thin strips (I used boneless, skinless thighs to keep the meat juicy and full flavored)
- small handful of shitake mushrooms, thinly sliced
- 1 large white onion, sliced in 1/4" pieces
- 1.5 tbs hot Mexican chile powder
- 1 tsp oregano (Mexican preferred, but I use what I have)
- 2 garlic cloves, finely minced
- 3 tbs apple cider vinegar
- 1/4 c. lemon juice
- 1 tsp salt (to taste before adding chicken)
- big pinch of ground cloves
- 1/4 tsp ground cinnamon
- 1 block of Queso Quesadilla or other Mexican melting cheese, grated (sometimes found with the sausages, sometimes with cheese, sometimes in the specialty cheese. Look hard. In the US, the most common brand is Cacique)
(Tortillas)
- 1 3/4c. "masa harina" mix (I found this quite cheap at Las Americas, but I've also seen it in local grocers and even the local Walmart in the Latin American aisle)
- 1 c plus 2 tbs warm water
- 1/2 tsp salt (I forgot this, however, and we did not miss it at all)
Looks like this will take forever, right? It doesn't, I promise. And it only takes one pan! The only special equipment you'll need is a tortilla press. I picked mine up at the local ethinic market for $14 and it's solid cast iron that will last forever.
Mix the marinade up (chile powder, oregano, garlic, vinegar, lemon juice, salt, cloves, and cinnamon) and coat the chicken strips throughly. Cover and set aside.
Roast your chiles (open flame is best, but I have to use the broiler on my electric oven. It does work, but it takes MUCH longer and it's somewhat of a pain. If you have a handheld propane torch, those work great for peppers! Blacken the skin all over, then toss in a paper bag and close it up. When cooled, slide the skin off, and remove the stem and seeds.) I like to do large amounts if I'm going to be cooking with roasted poblanos for the next few days and just keep them in the fridge. Puree the peppers once de-seeded. (This is optional, but it helped the flavor get around the filling evenly)
Fire up a large skillet over medium to medium high heat. (I go lower as my skillets on an electric stove are a killer because they hold heat too well). Once hot, add a drizzle of canola oil, and toss your mushrooms in. Cook until all the liquid is gone, stirring frequently so they don't burn. Remove from pan. Add a touch more oil, and add the onions. Cook until wonderfully carmelized, but still with a bit of crunch to them. Remove from pan.
Add a touch more oil to the pan, and dump in the chicken and marinade. Cook, stirring frequently until most of the marinade reduces out and the chicken is cooked through. Add the mushrooms and onions and cook for just a minute or two to let the flavors combine. Pull off of the heat and set aside. Mix in the poblano puree.
Mix the masa harina and water together until the dough comes together. It'll have a cookie dough like structure to it, so add water as needed to achieve that if too dry. Divide into 8 pieces, roll into balls and cover with a lightly damp towel to keep them from drying out.
The following are directions directly from Rick Bayless:
One by one, make the quesadillas: Line a tortilla press with two pieces of plastic cut to fit the plates. Gently press out a flattened ball of dough between the sheets of plastic into a 5-inch circle. Peel off the top sheet of plastic, flip the tortilla—uncovered side down—onto the fingers of one hand and gently peel off the second piece of plastic. In one flowing movement, roll the tortilla off your hand and onto the preheated griddle or skillet.
After about 30 or 45 seconds, when the tortilla has released itself from the cooking surface, flip it. Immediately spoon about 2 tablespoons of the filling into the center (top with about a tbs or so of the cheese, you'll get the hang of how much it can accommodate quickly!). Fold the quesadilla in half over the filling after another 30 or 45 seconds. Continue to cook, flipping the quesadilla ever 30 seconds or so, until it is richly browned in places and crispy-crunchy, 4 to 5 minutes—a little longer than you might expect. As you fold each tortilla over the filling, move on to making the next quesadilla. As they’re done, keep them warm on a baking sheet in the low oven.
As soon as you finish making the last quesadilla, serve them with guacamole or salsa.
My 15 month old inhaled these, along with my husband and myself. This recipe has made it into my permanent dinner rotation. Who thought quesadillas could be so hearty? The homemade tortillas take this to a whole new level - and this is from someone who never cared much for corn tortillas. Make some fresh, you won't be disappointed and they are so easy! The Mexican melting cheese has a very different texture (much creamier) than if you just used Monterey Jack or other American cheese...while you could substitute, it is worth using the real thing.
April 3, 2010
Empanadas and Halibut Ceviche
My empanadas have almost become legendary for those I've made them for. They're the perfect little package of food - much like how the atrociously unhealthy Hot Pocket found it's rise to fame. The original recipe I found some years ago on the Everyday Food website. Or perhaps it was the blog. I'm really not sure. Over the years the recipe has evolved some, and while I don't always maintain records with what I've done different, it lends itself to many different changes. I've never had a bad batch of empanadas!
I will say, this is a weekend meal - only because in making your own crust it is time consuming. However, these freeze amazingly once they are done, so I make large batches and freeze for weeknights when they only take a 30-40 minute trip through a hot oven to finish.
I decided that it would also be a night to try something different, and made a batch of ceviche. Ceviche is a hispanic dish of fish "cooked" by marinating in lime or other citrus juice. There are hundreds of wildly different variations on ceviche, so I decided to go with a more classic Mexican version. Recipe on the bottom provided by Chef Rick Bayless on the Food and Wine website. The ceviche was wonderful, though for those who are not a fan of the texture of sashimi, it may take some getting used to because the fish never gets to the full firmness one expects when they heat it in a pan. I adored it, though my husband felt there was a little too much cilantro for his tastes.
Empanadas:
(Filling)
Optional - I keep some salt free fajita seasoning in my spice mixes, and I'll often add a good bit to my empanada filling when the chili powder goes in. Season your filling to taste, don't be afraid to experiment here. I've found oregano, cumin, pepper, garlic and a little coriander all work well. Taste, taste, taste!!
(Crust)
Make the filling: In a 12" skillet over medium high heat, cook meat completely until there is no pink. (5-7 min)
Add jalepenos and onion, cook until soft, about 5 min. Stir in chili powder and tomatoes and cook over medium until mixture has thickened, 12-15 min. Season with salt, pepper, and other spices to taste. Fold in cilantro and let the mixture cool COMPLETELY.
Make the dough: In a bowl, combine flour, baking power and salt. Using your fingers, cut in the butter until the mixture is crumbly. Add just enough water so dough comes together (this may take a bit more if you're using wheat flour at all).
Form empanadas. Roll out dough, cut into circles. I use a small plate or bowl as a template. Place some cooled filling on one half of the circle, dampen edge of dough with a touch of water and fold over and crimp.
At this point, place on a cookie sheet and freeze if desired for 2 hours, then bag up for storage.
To cook either fresh or frozen: Preheat oven to 400 degrees F. Place on parchment lined (or silicone Silpat mat) cookie sheet. Brush with egg wash and bake until golden brown (30-40 min) rotate the sheets halfway for even browning.
Ceviche:
In a 1 1/2-quart glass or stainless steel bowl, combine the fish, lime juice and onion. Use enough juice to cover the fish and allow it to float freely; too little juice means unevenly "cooked" fish. Cover and refrigerate for about 4 hours, until a cube of fish no longer looks raw when broken open. Drain in a colander.
In a large bowl, mix together the tomatoes, green chiles, cilantro, olives and optional olive oil. Stir in the fish and season with salt, usually about 1/2 teaspoon. Add the orange juice or sugar. Cover and refrigerate if not serving immediately. Just before serving, gently stir in the diced avocado.
Make Ahead
Working ahead: The fish may be marinated a day in advance; after about 4 hours, when the fish is "cooked," drain it so that it won't become too tangy. For the freshest flavor, add the flavorings to the fish no more than a couple of hours before serving.
Notes
Serving options: Place the ceviche in a large bowl and let people spoon it onto individual plates to eat with chips or saltines; spoon the ceviche into small bowls and serve tostadas, chips or saltines alongside; or pile the ceviche onto chips or tostadas and pass around for guests to consume on these edible little plates. Garnish the ceviche with cilantro leaves before serving.
I will say, this is a weekend meal - only because in making your own crust it is time consuming. However, these freeze amazingly once they are done, so I make large batches and freeze for weeknights when they only take a 30-40 minute trip through a hot oven to finish.
I decided that it would also be a night to try something different, and made a batch of ceviche. Ceviche is a hispanic dish of fish "cooked" by marinating in lime or other citrus juice. There are hundreds of wildly different variations on ceviche, so I decided to go with a more classic Mexican version. Recipe on the bottom provided by Chef Rick Bayless on the Food and Wine website. The ceviche was wonderful, though for those who are not a fan of the texture of sashimi, it may take some getting used to because the fish never gets to the full firmness one expects when they heat it in a pan. I adored it, though my husband felt there was a little too much cilantro for his tastes.
Empanadas:
(Filling)
- 2lbs ground pork, beef, or turkey (I've also used 1 lb of meat and 1 can of salt-free black beans, drained and rinsed)
- 2 jalepeno chilies, minced (I used four Serrano peppers I had frozen from last seasons' farmer's market)
- 2 cans (14.5oz or one 28oz) diced tomatoes. Muir Glen Fire Roasted highly suggested
- 1 c fresh cilantro, chopped
- 2 medium onions, finely diced
- 1/2 tsp chili powder
- salt and pepper to taste
Optional - I keep some salt free fajita seasoning in my spice mixes, and I'll often add a good bit to my empanada filling when the chili powder goes in. Season your filling to taste, don't be afraid to experiment here. I've found oregano, cumin, pepper, garlic and a little coriander all work well. Taste, taste, taste!!
(Crust)
- 4 c all-purpose flour, plus some for dusting (for healthier empanadas, I use 1/2 white, 1/2 wheat flour)
- 2 tsp salt
- 1 c cold water
- 2 tsp baking powder
- 1/2 c (1 stick) cold butter, cut into pieces
- 1 large egg, lightly beaten with 1 tbs water
Make the filling: In a 12" skillet over medium high heat, cook meat completely until there is no pink. (5-7 min)
Add jalepenos and onion, cook until soft, about 5 min. Stir in chili powder and tomatoes and cook over medium until mixture has thickened, 12-15 min. Season with salt, pepper, and other spices to taste. Fold in cilantro and let the mixture cool COMPLETELY.
Make the dough: In a bowl, combine flour, baking power and salt. Using your fingers, cut in the butter until the mixture is crumbly. Add just enough water so dough comes together (this may take a bit more if you're using wheat flour at all).
Form empanadas. Roll out dough, cut into circles. I use a small plate or bowl as a template. Place some cooled filling on one half of the circle, dampen edge of dough with a touch of water and fold over and crimp.
At this point, place on a cookie sheet and freeze if desired for 2 hours, then bag up for storage.
To cook either fresh or frozen: Preheat oven to 400 degrees F. Place on parchment lined (or silicone Silpat mat) cookie sheet. Brush with egg wash and bake until golden brown (30-40 min) rotate the sheets halfway for even browning.
Ceviche:
- 1 pound fresh, skinless snapper, bass, halibut, or other ocean fish fillets, cut into 1/2-inch dice
- 1 1/2 cups fresh lime juice
- 1 medium white onion, chopped into 1/2-inch pieces
- 2 medium-large tomatoes (about 1 pound), chopped into 1/2-inch pieces
- Fresh hot green chiles (2 to 3 serranos or 1 to 2 jalapenos), stemmed, seeded and finely chopped
- 1/3 cup chopped cilantro, plus a few leaves for garnish
- 1/3 cup chopped pitted green olives (manzanillos for a typical Mexican flavor)
- 1 to 2 tablespoons extra-virgin olive oil (optional)
- Salt
- 3 tablespoons fresh orange juice or 1/2 teaspoon sugar
- 1 large or 2 small ripe avocados, peeled, pitted and diced
- Tostadas, tortilla chips or saltine crackers, for serving
In a 1 1/2-quart glass or stainless steel bowl, combine the fish, lime juice and onion. Use enough juice to cover the fish and allow it to float freely; too little juice means unevenly "cooked" fish. Cover and refrigerate for about 4 hours, until a cube of fish no longer looks raw when broken open. Drain in a colander.
In a large bowl, mix together the tomatoes, green chiles, cilantro, olives and optional olive oil. Stir in the fish and season with salt, usually about 1/2 teaspoon. Add the orange juice or sugar. Cover and refrigerate if not serving immediately. Just before serving, gently stir in the diced avocado.
Make Ahead
Working ahead: The fish may be marinated a day in advance; after about 4 hours, when the fish is "cooked," drain it so that it won't become too tangy. For the freshest flavor, add the flavorings to the fish no more than a couple of hours before serving.
Notes
Serving options: Place the ceviche in a large bowl and let people spoon it onto individual plates to eat with chips or saltines; spoon the ceviche into small bowls and serve tostadas, chips or saltines alongside; or pile the ceviche onto chips or tostadas and pass around for guests to consume on these edible little plates. Garnish the ceviche with cilantro leaves before serving.
March 31, 2010
Shepherd's Pie
I have to admit, while I generally roll my eyes at those who get all moony and star-struck by most celebrities, I am totally a Gordon Ramsay fangirl. There, I said it. The man is culinary genius, and while his recipes generally have long, drawn out, pretentious sounding names, they are actually much simpler to actually accomplish.
Seeing as my grandmother is originally from Scotland, we grew up with a lot of traditional food from the United Kingdom. Most of it stars very fondly in my memories of growing up, and shepherd's pie stands as the number one dish. The problem with Americanized shepherd's pie? It lacks flavor, the mince is usually greasy and soggy, and overall the dish is exceedingly bland.
Sound familiar? Then try this recipe - you won't be disappointed. Need more motivation? Go here and watch Ramsay himself prepare it in less than five minutes (edited, of course). Tell me that man couldn't make a grilled cheese look sexy?
Serves 4
Ingredients (amounts changed to rough Imperial equivalents where needed)
2 tbsp olive oil
Sea salt and freshly ground black pepper
1lb (plus a smidge...actually 1.1lbs) minced lean lamb
1 large onion, finely grated
1 large carrot, finely grated
2 cloves garlic
1-2 tbsp Worcestershire sauce (Lea and Perrins please!)
1 tbsp tomato puree (paste)
Handful of thyme sprigs, leaves picked
1 sprig of rosemary, needles chopped
1 cup red wine (I used a $9 cabernet sauvignon which worked quite well. Use a good drinking wine. If you are dead set against wine, you could sub for beef stock, but I would not recommend it)
1 1/4 cups chicken stock
1 1/4 lbs Desiree potatoes, peeled and cut into chunks (Desiree are nearly impossible to find here, use a waxy potato. To be honest, I used russet and still had a lovely mash at the end)
50g (roughly 2 ounces) butter
2 egg yolks
Parmesan, for grating
Olive oil
Sea salt & freshly ground black pepper
1. Preheat the oven to 180˚C/gas 4 (350 degrees F).
2. Heat the oil in a large pan until hot. Season the mince (lamb) and fry in the oil over moderate to high heat for 2-3 minutes. Stir the onions and carrot into the mince then grate the garlic in as well. Add the Worcestershire sauce, tomato puree and herbs and cook for 1-2 minutes, stirring constantly. Pour in the red wine and reduce until almost completely evaporated. Add the chicken stock, bring to the boil and simmer until the sauce has thickened
3. Meanwhile, cook the potatoes in boiling salted water until tender. Drain then return to the hot pan over low heat to dry out briefly. Pass them through a potato ricer then beat in the egg yolks, followed by about 2 tbsp grated Parmesan. Check for seasoning
4. Spoon the mince into the bottom of a large ovenproof dish. Using a large spoon, layer the mashed potato generously on top of the mince, starting from the outside and working your way into the middle. Grate some extra Parmesan over and season. Fluff up the mash potato with a fork to make rough peaks. Bake in the oven for approximately 20 minutes, until bubbling and golden brown
Notes from the Kitchen:
I went ahead and used the traditional lamb here. It wasn't as expensive as I thought it would be at Whole Foods since you need so little. However, the end result gave me a wonderful flavor from the mince that I thought almost overpowered the lamb. While not traditional, I would have no problems for substituting the lamb for a very lean ground beef to make this a little more budget friendly, making sure to drain any excess grease at the initial frying stage before adding the vegetables.
I did not have one crock of the right size to make this pie, so I ended up with four individual shepherd's pies which worked perfectly. Lesson here? Use what you have!
This is one of those times were I was too eager to eat dinner and neglected to take a photo. Seriously, go watch Gordon make this pie. It's making me want to make some more for dinner...
March 30, 2010
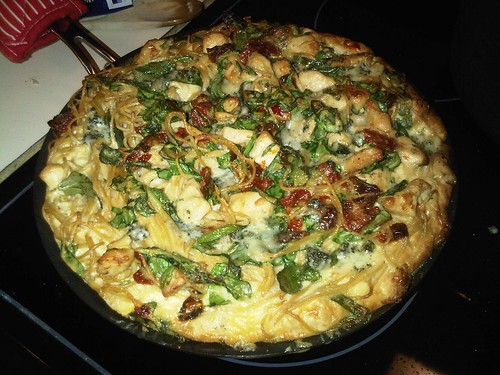
Special Spaghetti Cake
I love comfort food, and I think it's why I'm drawn to so many of Jamie Oliver's recipies. They are comfort food with a touch of class, and generally I don't have to be very spendy with my ingredients. My suggestions? The two things do not skimp on the cost of should be cheese and herbs. Herbs can be cheap, of course, if you grow your own - but if you don't, I'm a huge fan of the living plants you keep in the fridge for a few days. I've even had great sucess in transplanting these into soil to keep growing if I don't need all the herb at once! Once you cook with fresh herbs and full flavored cheeses, you will never be able to go back.
This simple pasta dish blew me away with it's abundance of flavor. It looked fabulous on Jamie Oliver's website, and I had to give it a try. I have to be honest, the idea of an oven baked spaghetti pie sounded a bit off, but trust me, follow the recipe - it's well worth it! You'll notice in my photo that my pan was not quite large enough. The pan you see there is a 10" pan - when he calls for an 11" pan, heed that warning! I made it with my smaller pan, but it was overflowing and mounded up high on top.
Adapted from Jamie Oliver's website.
600 ml (approx 2.5 cups) double cream*
4 large eggs
sea salt and freshly ground pepper
100 g (approx 1/4 lb) mature cheddar cheese, grated **
100 g (approx 1/4 lb) "smelly cheese" (Brie, Stilton, or goats cheese), cubed ***
2 large handfuls of baby spinach, roughly chopped
1 fresh red chili, deseeded and chopped (I had a small serrano left over from last year's farmer's market - it worked well, seeds and all)
1/2 of a small jar of sun-dried tomatoes packed in olive oil, drained and roughly chopped (I found the more the merrier with the tomatoes, so don't skimp!)
1 box of just cooked spaghetti (I use whole wheat pasta only - and out of those my favorite is Hodgson Mills - but standard is fine as well)
Knob of butter
Few fresh sage sprigs, leaves picked off stems.
1/2 - 1 lb chicken thighs, boneless/skinless, cubed ****
Preheat the oven to 180°C (350°F). In a large bowl beat the double cream and eggs with a good pinch of salt and pepper. Add the grated Cheddar, most of the smelly cheese, the spinach, chilli, sun-dried tomatoes and the cooked spaghetti. Gently stir to mix well.
Melt the butter in an ovenproof frying pan, around 11inches in diameter, and swirl it around so the base of the pan is nicely coated. Slowly pour in the spaghetti mixture and shake the pan to even the mixture out. Bake in the hot oven for 30 minutes until it starts to crisp on top. At this point, take it out of the oven and use the back of a spoon to make small indents into the top of the bake. Toss the sage leaves in a little olive oil then press one into each dip with a small cube of the remaining cheese on top.
Return to the oven and cook for 10 more minutes until crisp. Remove and leave to rest for a few minutes. Serve in wedges with a fresh green salad on the side.
Notes from the Kitchen:
*double cream is not available in the US except if you have a really great relationship with a local dairy. Heavy whipping cream is a decent substitute in this recipe from my own trials, read the carton and get the kind with the highest fat content possible.
** I used a nice smoked cheddar by Tillamook. It was economical and we love the remnants on crackers!
*** I used an imported Stilton I found at Reasors' (local grocer) for a great price. While generally not a fan of blue cheeses myself, the Stilton really carried the dish here.
**** The chicken is not in the original recipe. I added it as I had some chicken that needed to be used from a previous recipe. If you decide to use some as well, cook the chicken seperately before starting, and then add right before the spaghetti is added to the pan. I just pan fried quickly with some salt and pepper in a little canola oil.
A Few Notes for Readers
I love food, and while I love photography - it's no longer my main passion. My kitchen is small, and poorly lit thanks to switching to all CFL bulbs that cast a strange yellowish tinge to my photos now. As a consequence, my posts here may not have the most glamorous photos - in fact, I'll guarantee they won't be. Most will be taken with my trusty Blackberry - not the world's best camera. The point to that is this - great food doesn't require a massive setup in equipment, time or even energy. I have a family to feed, so oftentimes photos are the last of my worries. I like to get my meals on the table while they are still hot and we can enjoy the complexity of the dish - not to let it get cold while I set up and snap that perfect photo for my blog.
In the same stream, I will say I do not post recipes on this forum without either the author's permission, or unless it's something they've posted on their own site for free use due to intellectual property rights. I do always back link to the original authors and notate any changes that I've made personally to the original dish. I may give an accounting and a photograph of other dishes, but I will not post the recipe in it's entirety - so if you see something you love but I've not provided details, please look into getting the cookbook at your local library to give it a shot. That's how I get most of my cookbooks, and when I find one I absolutely adore, I order it directly from Amazon or another retailer.
In the same stream, I will say I do not post recipes on this forum without either the author's permission, or unless it's something they've posted on their own site for free use due to intellectual property rights. I do always back link to the original authors and notate any changes that I've made personally to the original dish. I may give an accounting and a photograph of other dishes, but I will not post the recipe in it's entirety - so if you see something you love but I've not provided details, please look into getting the cookbook at your local library to give it a shot. That's how I get most of my cookbooks, and when I find one I absolutely adore, I order it directly from Amazon or another retailer.

